A broken home vacuum cleaner can dramatically change your plans, ruin your mood and even reduce your family budget. However, do not immediately chop off your shoulder and go in search of a more reliable replacement. You can try to repair the unit at home. Such a solution to the problem will save a considerable amount, agree?
We will figure out how to disassemble a Samsung vacuum cleaner in order to independently return it to working capacity. The design of many cleaning units is similar, so the proposed instructions can be used to repair models of other manufacturers. The main thing is to act carefully and without haste.
Minor malfunctions and their elimination
If the vacuum cleaner begins to “bewilder” - it is wrong to perform its functions, to make noise loudly, to vibrate - it needs help.
Most often, the cause of the malfunction is the cleaning process itself: the dust bag is completely filled or one of the filters is clogged with debris.

In fact, partial disassembly of the vacuum cleaner is a regular maintenance step, especially for models with a multi-stage filtration system
Some vacuum cleaners are easy to disassemble, others require certain knowledge. In order not to be mistaken, we recommend that you look more often at the instructions, which are equipped with diagrams and tips.
Often you can repair the vacuum cleaner on your own, but if you are not good at repairing equipment, it is better to take the device to a service center, to specialists.
Problem # 1 - suction power drops sharply
If you notice that the dust is poorly absorbed, and the small debris remains intact on the floor, you will have to find out the cause by partial disassembly. First you need to make sure that everything is in order with the pipe, hose and brush.
Procedure:
- disconnect the hose from the vacuum cleaner;
- separate the pipe from the hose;
- remove the nozzle;
- carefully inspect each part;
- try to blow through the pipe and hose.
If a large object (a plastic bag, a sock, a sheet of paper) falls into one of the elements, you need to carefully remove it, then reassemble in the reverse order and try to start the device.

Often the cause of weak traction are hair wound on a brush or pieces of large debris that are stuck in a curved bend of the nozzle. If the cause cannot be eliminated without disassembly, you will have to unscrew the fasteners and separate the external elements
Sometimes the thrust weakens simply because the power regulator was accidentally touched and set to a minimum. Be sure to check it before any disassembly. Another cause of weakening traction is hose breakage.
Problem # 2 - Vacuum cleaner filters clogged
Unusual sound, weak traction, work stop - the consequences of clogged filters. For devices with a fill indicator, this can also be determined by the illuminated red light. In modern devices, everything is provided so that the filters are delivered easily and quickly.
Usually it is required to clean two basic elements - a plastic cyclone filter (transparent reservoir with compartments) and a sponge enclosed in a plastic container. But sometimes it is necessary to replace the HEPA filter, and for washing units - additional engine protection.
Photo tips for disassembling, cleaning and replacing:
Image Gallery
Photo from
Cyclone filter container
Plastic grill to protect the HEPA filter
New HEPA Filter for Samsung
Sponge filter in container
As you can see, the disassembly of the Samsung vacuum cleaner for cleaning filters is elementary and is carried out quickly. Items are washed in warm water with a non-aggressive detergent. Then they need to be dried and reassembled.
Problem # 3 - the device does not turn on
A standard check with a non-working device is to include it in the network. Make sure that the plug of the power cord is plugged into the outlet and the power adjustment button is set to the desired division.

Typically, Samsung devices are equipped with LED indicators. When working correctly, they light green, when filling the dust bin, red
If the indication does not work, and the vacuum cleaner does not make noise, most likely you will have to repair or replace the engine. But there may be problems with the board, so disassembling the case is necessary in any case.
Complete disassembly step by step instructions
Partial disassembly is done when replacing or cleaning filters, but in order to get the engine, it is necessary to disassemble the device completely. We offer detailed photo instructions for disassembling, which will help you deal with the repair of a Samsung vacuum cleaner yourself.
Stage # 1 - carry out a fault diagnosis
When you use one device for a long time, you perfectly imagine how it behaves during operation.
An experienced user does not have to look at the indicator of filling the bag or tank, he even determines by the sound the time of cleaning the dust bag or filters. Consequently, he will also determine the fact of a malfunction by the unusual behavior of the assistant.
If the replenished vacuum cleaner starts to buzz or hiss, the mechanism with a broken engine or circuit board makes intermittent sounds, starts to “spit” with dust, smell like burnt wires, or simply does not respond to plugging in.

You should be wary if, after emptying the tank or washing the filters, the device makes noise, but does not fulfill the main function - it does not absorb dust. Also, not everything is in order if there is traction, but it is very weak and does not change with the adjustment button
If you doubt the serviceability of the vacuum cleaner, you can try to disassemble it. This is a simple procedure that does not require special knowledge and special skills. As instructions, you can use videos or photo-instructions of craftsmen carefully shot by them and posted on the Internet.
Stage # 2 - we select tools and materials
To disassemble the vacuum cleaner body, you do not need to purchase a special tool. Most likely, a pair of screwdrivers, Phillips and slotted, which can be found in the household of any city dweller or villager, will come in handy.

Basically, screwdrivers will have to unscrew the screws that fasten the various parts of the case - the engine is enclosed in several plastic or metal covers for soundproofing reasons
No tools are needed to disassemble the filters, as this is a regular maintenance procedure. You just have to manually remove the lids or open the plastic boxes.
On some models, to change the HEPA filter, the rear grill should be removed by unscrewing 2-4 screws with a screwdriver as well.
But if manipulations with the engine, board elements, wires are coming, the following tools and materials may be required:
- pliers;
- file;
- awl;
- sandpaper;
- vise;
- construction knife;
- spare connectors and wiring.
Small parts are inexpensive, but a faulty engine requires replacement - an average of 1,650-2,600 rubles.

If the vacuum cleaner is budgetary and costs no more than 3,500 rubles, then the replacement is tangible from a financial point of view
Instead of an expensive original part, you can look for an alternative mechanism, but you should pay attention to the materials from which it is made.
Stage # 3 - disassemble the vacuum cleaner body
It often happens that there is a malfunction in the process of disassembling the device, that is, not necessarily the cause of the malfunction is a failed engine. The thermal relay connector may have moved or damage to the circuit board has occurred.

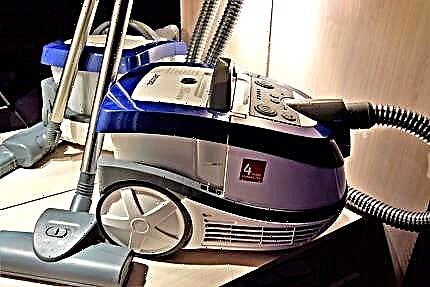
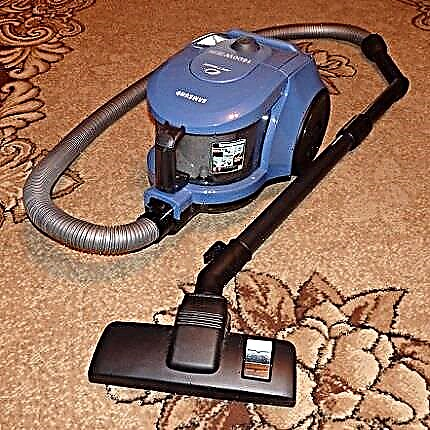
As a sample we take the popular model SC8854 with a power of 2200 W, designed for dry floor cleaning and cleaning of home textiles - furniture upholstery, blackout curtains, bedspreads
All actions can be performed by an unprepared person, since disassembling this model requires attention, accuracy and the ability to use screwdrivers - flat and cross.
Step-by-step instruction:
Image Gallery
Photo from
Step 1 - first, carefully remove and set aside the protective grill, then remove the filter itself and check the degree of contamination. If the "membranes" are light, then the filter is working, if the dark ones - it's time to change
Step 2 - we take out the cyclone filter from transparent plastic. To do this, push the button on the handle to the side. We put the tank aside so that in the future we can take it apart too - take out the sponge filter from the special compartment
Step 3 - unscrew the fasteners. For further disassembly, a Phillips screwdriver will be required. With it, we unscrew five self-tapping screws recessed into the plastic of the case: four of them are located at the edges of the recess for the tank, and the fifth - in the back, behind the engine
Step 4 - remove the upper case. We take a flat screwdriver - with its help it is much easier to perform actions. We pry the glossy surface of the case in the area of the wheel and gently wring it first on one side, then on the other
Step 5 - disconnect the board connector. The lid can be easily removed, but the connector will hold it - a small red part of a cubic shape. The connector must be carefully disconnected and released, then you can freely remove the cover and set it aside
Step 6 - take out the electronic filling. The board does not need to be disconnected, it can be removed together with the casing. Before unscrewing the fasteners, turn off the two wiring, one of which connects the board to the motor. Then unscrew the four screws and remove the casing
Step 7 - removing the round case. Several different shields are needed to enhance sound insulation. The last protective case has a round shape and is mounted on four screws. Unscrew the lid and set it aside
Step 8 - we get the engine from the bottom of the protective cover .. This is the last action. To permanently disconnect it, you need to remove the thermal relay - a small part with a wire that is mounted on a metal motor housing
Cyclone Filter Removal
Screwdriver unscrewing fixing screws
Disconnecting the upper case
Disconnecting the photodetector board connector
Removing the cover with the board
Detachment of the round protective housing
Vacuum cleaner disassembly
On this, the disassembly process can be stopped. If you are sure that the engine is really broken, then the damaged part must be taken to a service center in order to buy or order a new one according to the model.
But if you think that you can restore the engine yourself, then we offer instructions for subsequent disassembly.
Stage # 4 - perform engine repair
The engines are different, so there is no guarantee that you will be able to disassemble the unit and find a breakdown. In a pinch, take the broken mechanism to a repair shop for replacement. But if the repair experience was already there, then we can hope for a positive outcome of the operation.
Image Gallery
Photo from
Dismantling the engine from covers
Power and protection wiring
Impeller removal
Stripping and crimping wires
After the repair, we carry out testing. To do this, connect the terminals of the tester to the crimped wire and dial. Finally, you can crimp the plug that covers the impeller and clean the inside of the engine.
After reassembling, it becomes clear how well the repair went. In this case, the cause was a broken wire, which was in sight.
Impeller unbalancing or bearing failure often also occur. But there are times when the master does not find a breakdown, then the only way out is to replace the entire part. Sometimes it is more advisable to choose a new vacuum cleaner than to spend money on an expensive spare part.
The vacuum cleaner buzzed - we disassemble the engine to the impeller:
Complete disassembly and cleaning of the device:
Photo and video instructions help out when you urgently need to repair the vacuum cleaner, but there is no service center nearby or there simply is not enough money. Dismantling the Samsung vacuum cleaner, as you have already seen, is not at all difficult to produce. If you have the desire and time, you can perform some procedures yourself, without the involvement of specialists.
Have you ever had to repair a vacuum cleaner yourself? Please tell us what was the specifics of disassembling the unit, and whether it was possible to repair the equipment. We look forward to your comments, questions and advice on the implementation of the repair - the contact form is located below.