For cooking and constant heating of a private house with an area of 30 ... 50 m², the Swedish heating and cooking stove, made of brick, is the best suited. The simple construction of the structure allows you to save on construction - buy materials and do masonry work with your own hands. From us - a description of the design of the stove, some of the nuances of the construction plus three projects with diagrams and orders.
Design and principle of operation
The classic "Swede" is a symbiosis of two heaters: a traditional stove and a somewhat expanded "Dutch" - a simple oven of a channel type. An indispensable attribute of the structure is the oven, located next to the firebox.
How does the Swedish stove work:
- The flame burning in the furnace heats the hob directly. A nearby oven is separated by a quarter or half-brick wall, therefore it receives heat from the heat of the furnace and flue gases.
- Red-hot combustion products wash the body of the oven from above and behind, then, under the influence of the natural draft of the chimney, they descend to the lower zone, where the outlet channel is located.
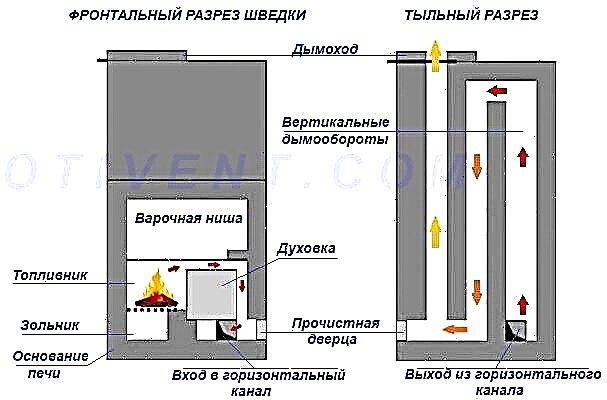
- Through the specified opening, hot gases leave the cooking section and penetrate into the heating panel, consisting of 3-4 vertical channels. Moving along the chimneys, the combustion products warm the brick walls, then go out through the chimney.
- An oven with stoves is provided above the cooking niche, heated from below by a stove, and behind by a system of channels.

Note. There are furnaces with horizontal flues, but because of the accumulation of soot, such structures are used less often.
The "Swedish" combustion chamber together with the oven forms a mini-hood, since the horizontal outlet channel is at the bottom. On the way to the hole, the heated gases give off a large amount of heat to the cast-iron stove cover and the metal walls of the oven. Thanks to such a device, the "Swede" is not inferior in efficiency to the Russian stove, but is more compact and simple to execute.
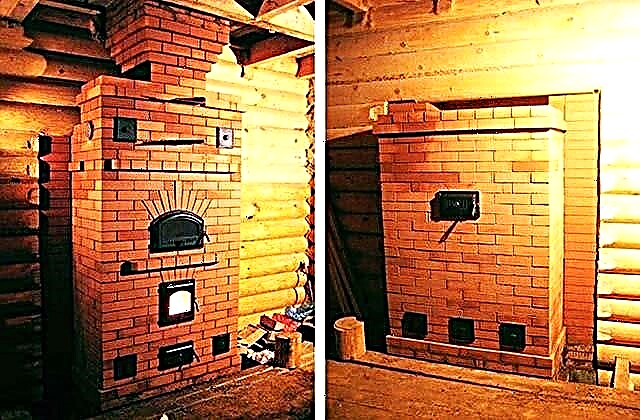
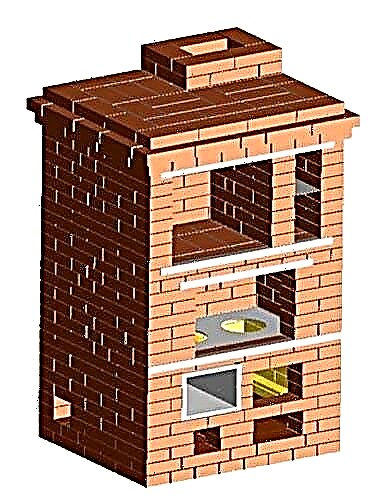
Initially, the Swedish heating and cooking stove is designed to be placed in a wall between two heated rooms - a kitchen and a bedroom (or living room), as shown below in the photo. The first room is heated by the stove itself and the open oven, the second - by brick coarse. There are varieties of stoves with summer running mode - the valve closes, the gases go to the exit bypassing the chimney sweeps.
Construction Nuances
The proportions and sizes of the "Swedish" cameras are carefully verified, therefore only experienced craftsmen - stove-makers can make changes to the masonry scheme. When constructing a furnace, the following points must be taken into account:
- The construction is massive - a reliable foundation is needed that is not connected with the foundation of the house.
- As the exhaust gases move into the mines through the lower opening, the stove intensively heats the floor. To avoid useless heat consumption, heat-resistant thermal insulation is laid under the base - 3-5 layers of basalt cardboard.
- The body of the Swedish heater experiences high temperature stresses. Therefore, the firebox is laid out from the inside with fireclay (refractory) stone, and for construction, high-quality sand and clay mortar with the addition of a mortar is used.
- It is unacceptable to install a water heating boiler instead of an oven if such a reconstruction is not provided for by the project. Intensive heat removal will significantly reduce the temperature of the gases, decrease traction and heating efficiency from coarse. The flues will become clogged with soot.
- The "Swedish" can be supplemented with a fireplace - to build it from the side of the heating shield by organizing separate chimneys. Option two: the fireplace insert with its own gas duct is discharged into the common pipe, but is heated when the stove is not working.

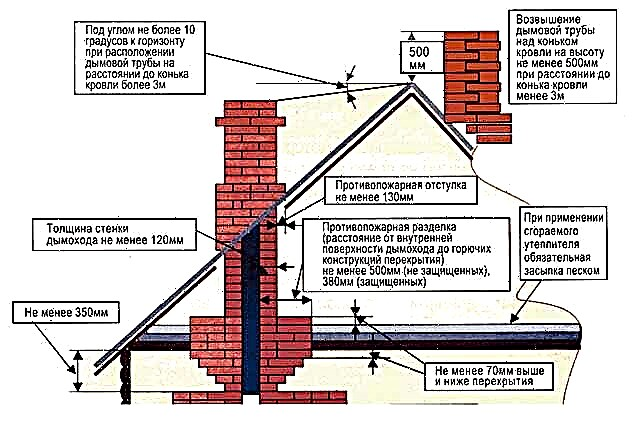
An important point.Good traction is required to move gases within vertical channels. The tip of the chimney will have to be raised at least 60 cm above the ridge and make sure that it does not fall into the wind support zone of other buildings.
Work Instructions
In the framework of this publication, we will not teach you how to cook stoves - the masonry technology is described in the relevant instructions - how to build a fireplace for heating a house on wood. Here we will offer general recommendations for the construction of the furnace - "Swedes":
- The rubble or reinforced concrete foundation of the structure is placed on a stable soil horizon. Remove the top soil layer and dig a pit of the required depth, the size is 10 cm wider than the dimensions of the stove. In subsiding soils, lay a pile-screw or pile-grillage foundation.
- A mortar mixture of fine sand (particles 1 ... 1.5 mm) with clay of medium fat content goes to the masonry of the furnace. It is better for beginners to buy ready-mixed building mixtures in bags.
- Soak red brick during the day, and make the solution thicker so that it does not spread when it comes into contact with building materials.
- Fireclay brick is not soaked, but only rinsed from dust immediately before placing in a row.
- Refractory stones are placed on a solution of chamotte + refractory clay in a ratio of 1: 1, the optimal solution is to purchase a finished mixture of type “Superkamin Refractory”. Ceramic masonry is not bandaged with fireclay, between them a gap of 5-6 mm wide is made, laid with basalt cardboard.
- Foundations and pipes are built on an ordinary cement-sand mortar, clay is not suitable.
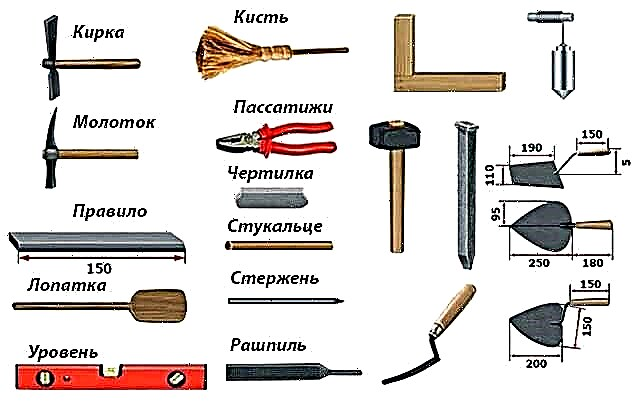
To erect the stove, prepare the tools shown in the photo. The concrete base should harden within 28 days after pouring, then it is covered with waterproofing from roofing material (2 layers) and basalt cardboard.
Spread the classic "Swedish"
The dimensions of this furnace are 102 x 88.5 cm in plan, height - 2.03 m, heating power - 3.2 kW. Accordingly, the heating area is up to 40 m² of a country house insulated according to the climate in the area of residence.
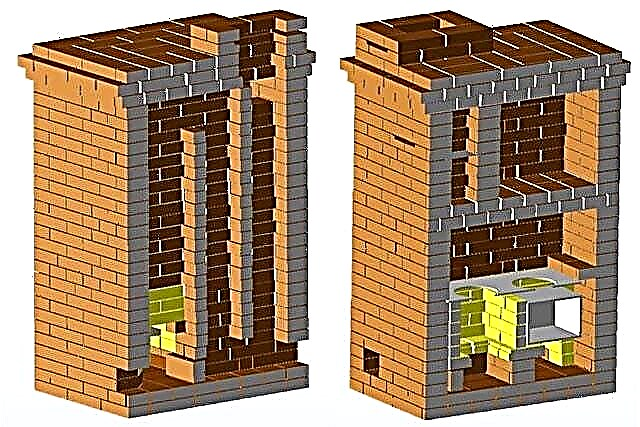
Comment. In the presented model, there is no channel for the summer passage of gases, so it is more convenient to use the stove for cooking in winter. The sectional view of the heater is shown in the picture below.
To independently add the traditional “Swede”, purchase the following materials:
- brick full of ceramic standard sizes 250 x 120 x 65 mm - 553 pcs.;
- chamotte brick ША-8, working temperature - up to 1300 ° С, size 230 х 114 х 65 mm - 33 pcs .;
- grate 30 x 20 cm;
- oven 45 x 25 x 29 cm;
- doors: furnace 21 x 25 cm, blew 14 x 25 cm, revision 14 x 14 cm (3 pcs.);
- hob 2 burners made of cast iron 410 x 710 mm;
- gate valves: smoke 25 x 13 cm, exhaust 13 x 13 cm;
- equal-angle steel corner 45 x 45 mm; total length 6.5 m;
- steel strip with a section of 50 x 5 mm, length 2 m;
- 2 mm thick metal sheet - 1 m².
According to fire safety requirements from the side of the firebox, a sheet of roofing steel 70 x 50 cm is laid on the floors. Building materials for the chimney and foundation are not included in the list.
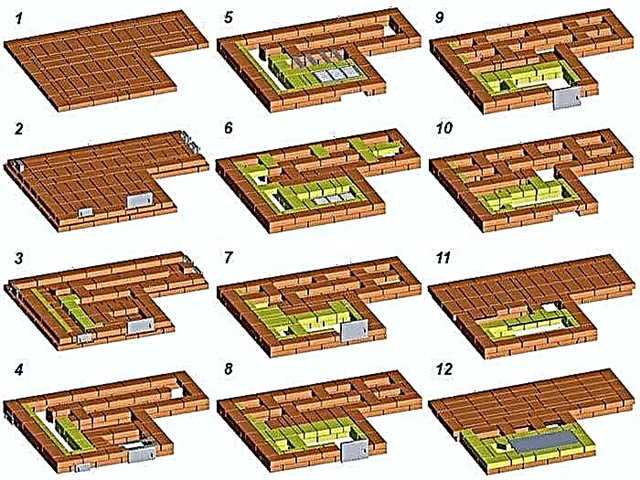
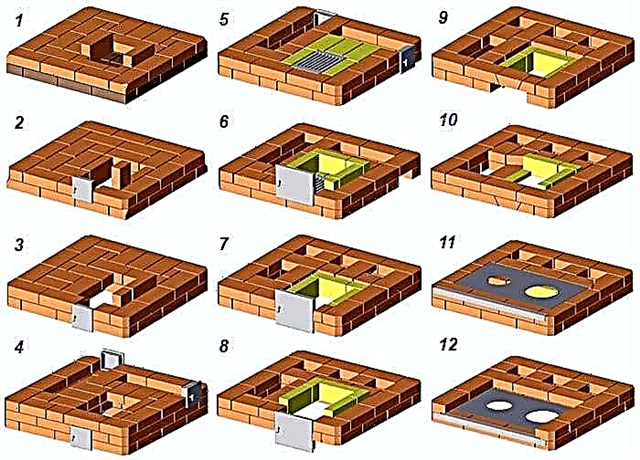
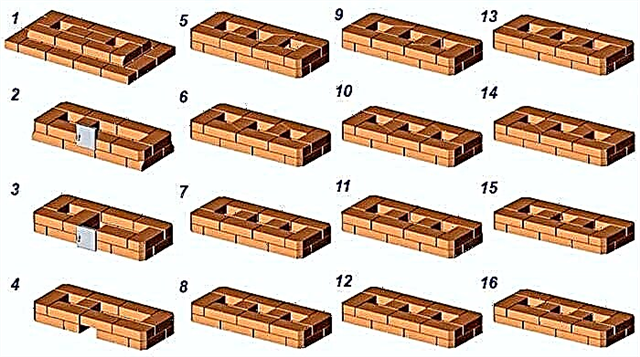
When ready, the stove - “Swede” is laid out in accordance with the presented orders:
- Rows 1, 2 are continuous; on the third, the outlines of the ash pan, secondary chamber for the oven and vertical shafts are laid. We fix 3 cleaning doors and one basement.
- The fourth tier is a continuation of the masonry according to the drawing, the fifth one overlaps the installed doors. We begin to form the bottom of the firebox from fireclay bricks and put the grates, after making a depression in the stones with a grinder.
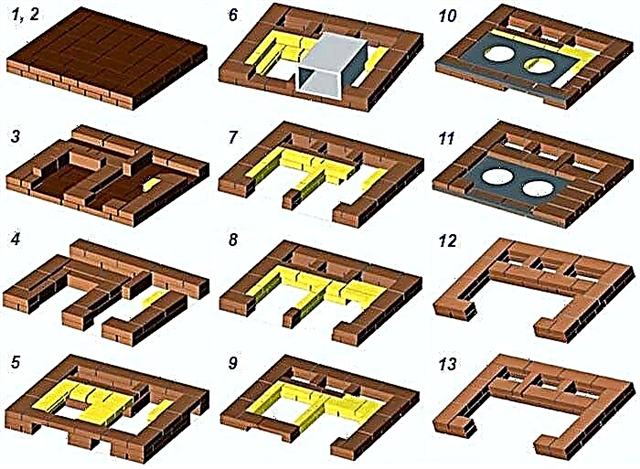
- Row 6 - lay out the walls of the combustion chamber, mount the oven and the loading door. Between the furnace and the oven compartment we make a partition толщиной thick of fireclay stone. We build the 7th horizon according to the scheme, on the eighth we block the lower gas duct, the ninth tier covers the door of the main chamber.
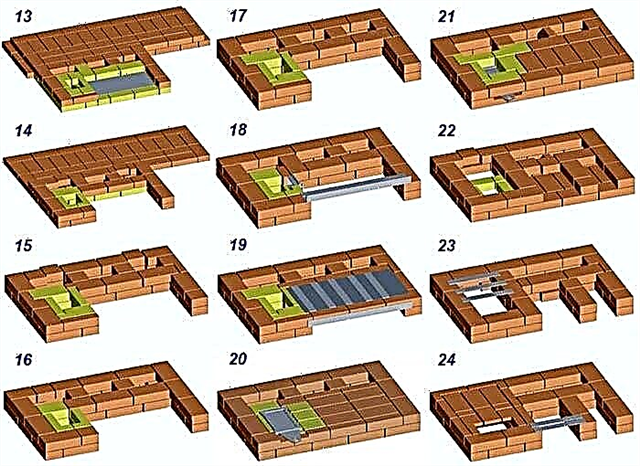
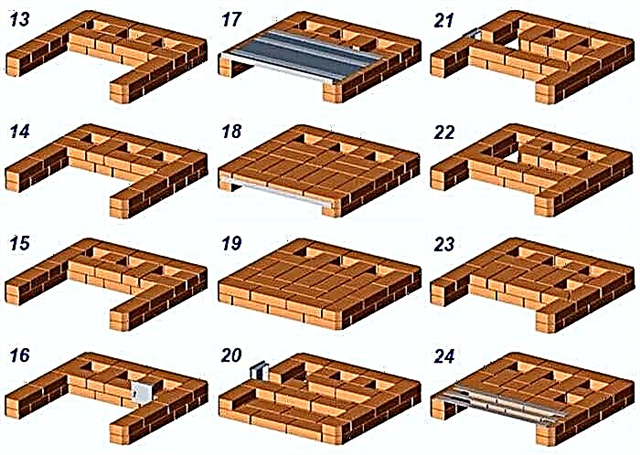
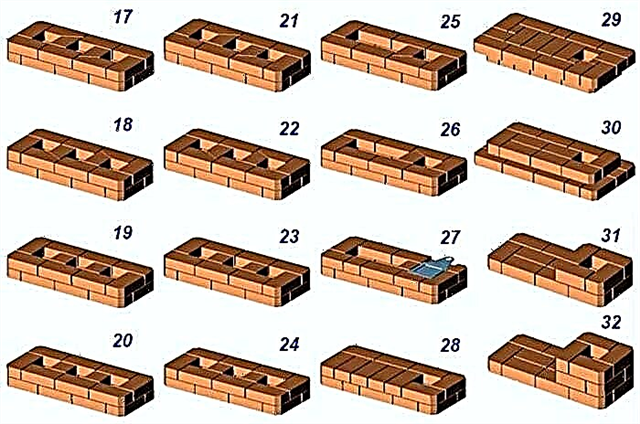
- After the tenth row, a hob and a metal corner are installed on the front side. On the 11th, niche walls begin to form, horizons 12-16 - continued.Then we lay the reference corners and the brick floor - row number 17. On the left we leave an exhaust opening over a niche the size of a half brick.
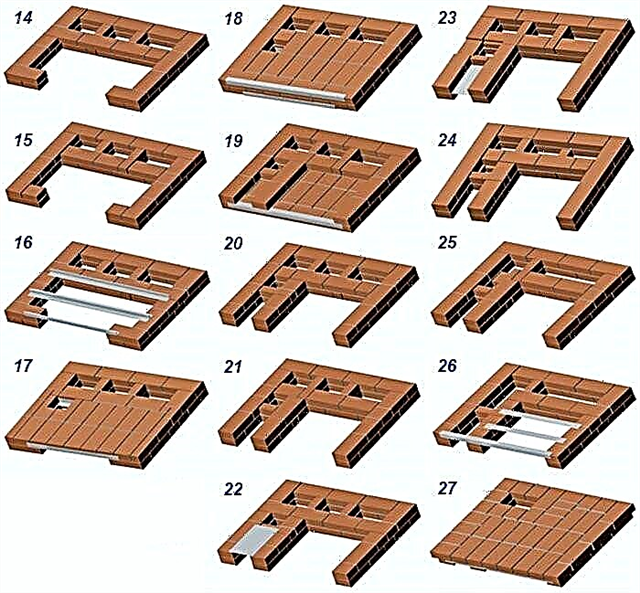
- On the 18th tier we fix the second end corner and begin to lay the walls of the drying chamber (rows 19-26). After 22 horizons, we cover the stove with a sheet of 34 x 19 cm, on the 26th row we put the next overlapping angles, on top we place a metal plate measuring 905 x 800 mm.
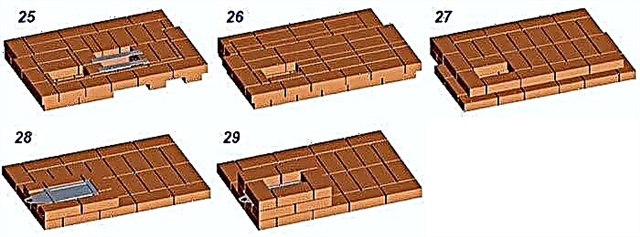
- Tiers 27-29 are continuous, leaving one opening of the chimney. Rows 30-31 - we form the beginning of the pipe with an internal channel of 250 x 140 mm.


Further laying is carried out on cement mortar, in compliance with fire safety rules. That is, in the wooden ceiling, a kiln is laid out with a thickness of one and a half bricks (38 cm), on the roof there is a retreat of 130 mm, as is done in the diagram.
Note. Hereinafter, materials from the site “Heating furnaces and fireplaces” of the Belarusian master Nikolai Zolotarev were used.
Project stove with stove bench and stove
The design shown in the photo is an alternative to a bulky Russian stove, requiring more consumption of materials and craftsmanship for the construction. The thermal power of the "Swede" with a sunbed and a traditional stove is 3.5 kW, the heated area is 40 ... 45 m². Dimensions of the furnace itself - 1245 x 765 mm, stove benches - 1910 x 765 mm.
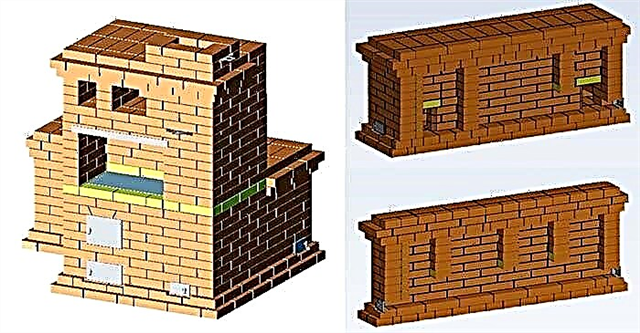
The heater has a summer operation mode - a direct channel is made to the left of the combustion chamber, which is closed by a valve for the winter. Inside the lounger, the combustion products penetrate through the lower horizontal channel, pass through a system of vertical flues, from there they return to the heating shield and fly out through the chimney.
How many and what building materials will be needed for masonry:
- full red brick (standard) - 870 pcs.;
- fireclay stone type ША-8 - 140 pcs.;
- grate size 415 x 240 mm;
- cooking cast iron panel 65 x 31 cm;
- damper 13 x 25 cm - 2 pcs.;
- doors: loading 21 x 25 cm, ash 14 x 25 cm, revision 7 x 13 mm (5 pcs.);
- corner No. 5 (50 x 50 x 5 mm) 1 m long;
- steel strip with a cross section of 50 x 5 mm - 7 m;
- metal plate 375 x 360 mm.
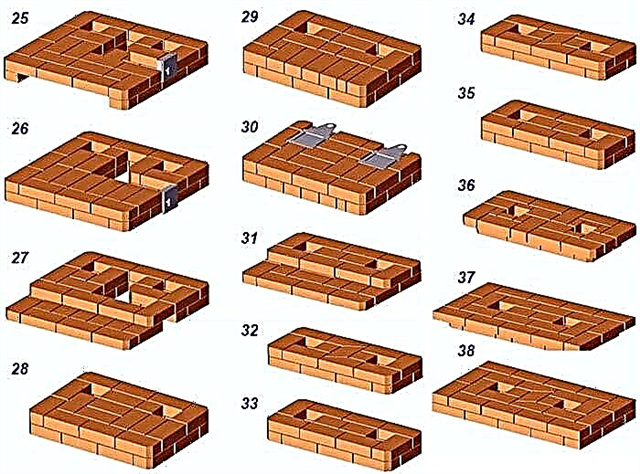
We build a Swedish stove bench in the usual manner - first the foundation, then waterproofing and laying of non-combustible insulation. Next we go in order:
- We put the first and second tier in full, then we fix 5 doors - one blower, 4 revision doors. On the third, we lay the walls of the ash pan and horizontal channel of refractory bricks.
- Rows 4, 5 - continue to build walls according to the drawings. At horizon 5, we mount the grate and cover with steel strips the technological opening formed in the middle - it will not be used in any way. Tier No. 6 forms the vertical channels of the bed, the laying of the firebox continues.
- On the 7th horizon, we put the loading door of the combustion chamber, 8-10 rows are laid out according to the scheme - we erect the walls of the firebox and the sunbed to the end. The eleventh continuous tier we block the bench, after the twelfth install the plate.
- Row number 13 completes the construction of the stove bench and begins the construction of the side walls of the cooking niche. Tiers 14-18 - continuation of the masonry, on the eighteenth we put a support corner on the front side and an exhaust door. A steel strip is laid next to the corner to better support the facade of the furnace.
- Horizon No. 19 forms a niche overlap - first we put bricks, then we cover with sheet metal, we place stiffeners from 5 steel strips on top. By the twentieth row we completely cover the niche; we cut into the channel a summer shutter. Tiers 21-23 are constructed according to the rules.
- On the 23rd row, we put 3 stripes above the left vertical shaft, we overlap it with the 24th horizon. Similarly, tiers No. 25, 26, 27 form the overlap of the drying niche and the stove.
- The last rows of the stove (28, 29) serve as the basis for the pipe. After 28 tiers we put a smoke valve, then we begin the construction of the pipe.


Since the textual description of the masonry does not adequately reflect the progress of work, we suggest that you look at the step-by-step video tutorial for the wizard:
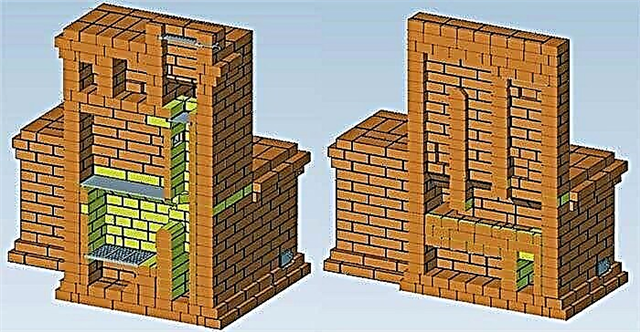
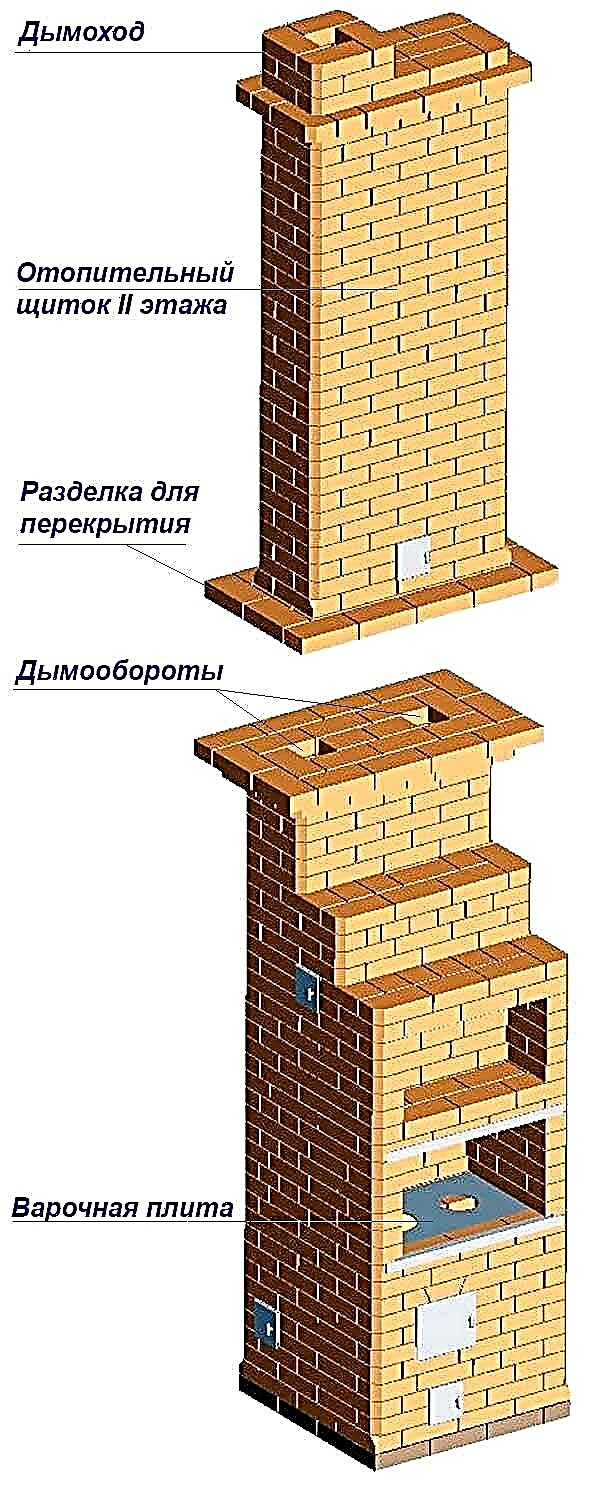
Oven for heating a two-story house
If the channel part of the "Swede" is increased in height, it is possible to organize the heating of rooms on the second floor, which is implemented in this project. The furnace with stove and stove remains unchanged. The dimensions of the stove near the base are 89 x 89 cm, the heating shield on the 2nd floor is 89 x 38 cm.
The total heat transfer of the furnace is approximately 4 kW. The distribution by floors looks like this: below, the area is heated to 25 squares, above - 15 m². There is no summer mode, but there is the possibility of floor heating - the shutters block the channels of the lower or upper part.
Materials for construction:
- clay brick red (solid) - 950 pcs.;
- chamotte brick ША-8 - 18 pcs.;
- grates 200 x 300 mm;
- cooker for 2 burners 71 x 41 cm;
- gate valve 130 x 130 mm - 3 pcs.;
- doors: furnace - 21 x 25 cm, the rest - 14 x 14 cm (7 pcs.);
- equal-angle corner 40 x 5 mm - 2 m;
- strip 50 x 5 mm - 5 m;
- sheet of metal 50 x 80 cm.
Given the height and decent weight of the structure, it is recommended to pay special attention to the strength of the foundation and the alignment of each row in the laying process, so that the leaning tower of Pisa does not work. Just adhere to the construction technology and take work responsibly.
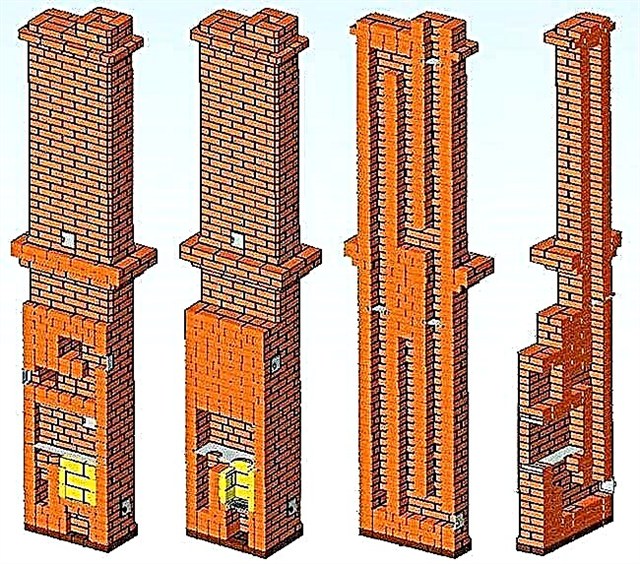
The construction of the "Swede" begins from the first floor, guided by the diagrams and drawings of the furnace in the context of:
- We lay out a solid zero tier, on the first we begin to build the ash compartment of the stove. On the second horizon we put the chamber door, the third we build according to the scheme, after the fourth we fasten 2 revision doors.
- Row number 5 - we lay the bottom of the firebox from the refractory, mount the grates. On the 6th tier we install a furnace door, form the walls of the wood-burning chamber and smoke chimneys. The seventh and eighth horizons are a continuation of the masonry according to the orders, the ninth and tenth rows cover the boot opening. On row 10 we make an opening connecting the firebox to the left channel.
- After the construction of the 11th tier, we put the slab and front end corner. Horizons 12-17 form a niche for cooking. A ventilation door is mounted on the 16th row, the seventeenth is blocked by a metal plate and stripes. Next, lay out two tiers of flooring - No. 18, 19.
- Horizon No. 20 begins to form a drying niche; a clean door is placed on the side. Rows 21-24 are done according to the schemes, then we stack the overlapping bands of the upper chamber. We cover the dryer with tier No. 25, we fix the door on the right — the revision.
- In rows 26-30 we continue laying, we install 2 smoke dampers. The 27th horizon reduces the size of the stove, forming a ledge. The second “step” appears on the 31st tier, then we drive two chimney turns without changes up to the 35th row inclusively. Horizons 36–38 expand the furnace again, a fire cutting is formed (passage through the ceiling of the 1st floor).


Comment. The height of the main section of the stove is 2.6 m. If the ceilings of the room are higher, add the required number of rows of bricks between tiers 32–35.
After laying the bottom of the two-story "Swede", we proceed to the construction of the upper channel section:
- The first tier narrows the furnace after cutting, on the second we fix the next revision door.
- Further we continue to drive 3 channels in height according to the same schemes. Having reached horizon 27, we build in the main valve.
- Row No. 28 covers 2 vertical shafts, the remaining tiers 29–32 form the transition to the chimney.


Finally, about drying and kindling
The final stage of construction is the drying of the furnace body, preliminary heating. In this regard, the "Swede" requires a cautious approach:
- You can’t immediately kindle firewood in a firebox.
- First, the masonry should dry for 2 weeks. If the weather is cold and damp, use an electric fan heater.
- For 14 days, regularly heat the stove in small portions of dry firewood (3-4 kg per day). Use wood species that produce little soot - aspen, acacia, poplar.
Tip. During the first kindling, open the cleaning doors and insert the crumpled newspapers into the openings. The paper is moistened first, then it will dry.When the newspaper ceases to be damp, the drying process can be considered complete.
Do the first working fireboxes with a small amount of firewood, gradually increasing the load. Do not forget to open the dampers of the winter course, so that the “Swede” warms up evenly.